Connect Gravity Forms to ClickUp via the API and Instantly Create new tasks from Gravity form submissions without a 3rd party integration app.
I am a WordPress developer. I use ClickUp to keep track of client projects and Gravity Forms to capture new leads on my website.
I wanted to connect ClickUp and Gravity Forms. My specification was instantaneous task creation on form submission (no delay), no ongoing cost, and the ability to populate Clickup Custom Fields.
I initially looked at Zapier – the “2min integration”. Yes. It took 2 mins, but there was no way to feed into the custom fields I have set up. My custom fields are “Customer Email Address,” “First Name,” and “Last Name,” and are critical data points for client task management.
Next I looked at Integromat – and yes, I could transfer gravity forms data into custom fields. But, on the free plan, I get 1000 Operations (one every 15 mins), which is 96 a day, which means less than 11 days’ worth of operations for one scenario, and less than five if I have the two allowed with the free plan.
I have multiple forms and want the task to be created as soon as a form is submitted (not 1 hour later), and quickly would exhaust even the standard plan ($29/month)
So that left me looking carefully at the Clickup API documents and realizing that I could hook an HTTP request to the gform_after_submission hook and send the required form entry data into my ClickUp App. Connecting ClickUp and Gravity Forms via the ClickUp API would meet my requirements. This method would be:
- Instant – the call to the API is triggered by form submission
- Cost Efficient – no 3rd party app is being used, so I can hook up multiple forms at no additional cost
- Full Data Transfer – I can take form data and send to specific ClickUp Custom fields
How to connect ClickUp and Gravity Forms
Step 1: Authenticate with ClickUp API 2.0
For this post, I will use the most simple method – the personal token
ClickUp > Settings > Apps
This token starts with pk_.
Step 2: Find the List ID where you will be creating the new Task
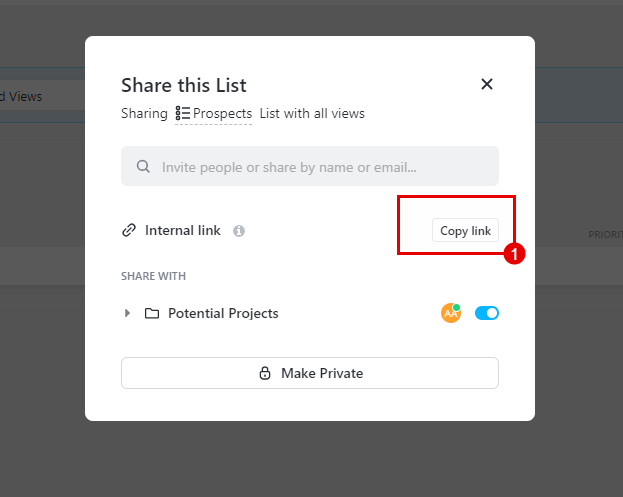
You can use a GET request via the API, but it’s much quicker to click on the three dots to the right of the list name. Choose “Share List” and press the “Copy Link” button to the right of the Internal Link (Box 1 in the screenshot below)

This link will look like this
https://app.clickup.com/1111111/v/li/12345678
where the last numbers are the list ID Number
Step 3: Create the code to push the form submission data to ClickUp to create a task
The gform_after_submission action hook executes at the end of the submission process (after form validation, notification, and entry creation). I will use this hook to feed the form submission data to ClickUp).
Note: the Form ID number after gform_after_submission applied this hook to a specific form (in this case, form ID 1).
add_action( 'gform_after_submission_1', 'ns_post_to_clickup_1', 10, 2 );
function ns_post_to_clickup_1( $entry, $form ) {
}
Note we will be using the $entry object to grab the data we want to push to Clickup.
function ns_post_to_clickup_1( $entry, $form ) {

//User $gfbody just to check you are capturing the right information
$gfbody = array(
         'First name' => rgar( $entry, '1.3' ),
         'Last Name' => rgar( $entry, '1.6' ),
         'email' => rgar( $entry, '2' ),
         'website url' => rgar( $entry, '20' ),
         'Needs' => rgar( $entry, '26' ),
              );

//GET API Instructions
          $baseURI = 'https://api.clickup.com/api/v2/list/';
          $listID = '1234567'; //Potential Prospects
          $endpoint = '/task';
          $endpoint_url = $baseURI .  $listID .$endpoint;


//Setup Json code that will transfer the data

  $body = '{
      "name": "'. rgar( $entry, '1.3' ).' '. rgar( $entry, '1.6' ).'",
      "description": "'. rgar( $entry, '20' ).'",
      "assignees": [
                    1234567
                ],
      "tags": [
                    "Website Contact Form"
                ],
      "status": "To Do",
      "priority": 2,
      "due_date": '.(strtotime("today 10:00")*1000).',
      "due_date_time": false,
      "start_date_time": false,
      "notify_all": true,
      "parent": null,
      "links_to": null,
      "check_required_custom_fields": true,
      "custom_fields": [
            {
            "id": "yyyyyy-1234-1234-1234-123456789",
             "value": "'.rgar( $entry, '1.3' ).'",
             "type": "text"
          },
            {
            "id": "zzzzzz-1234-1234-1234-123456789",
            "value": "'.rgar( $entry, '1.6' ).'",
            "type": "text"
          },
            {
            "id": "aaaaa-1234-1234-1234-123456789",
            "value": "'.rgar( $entry, '2' ).'",
            "type": "email"
          },
           {
            "id": "bbbbb-1234-1234-1234-123456789",
            "value": "Qualified Prospect",
            "type": "labels"
          },
           {
            "id": "cccccc-1234-1234-1234-123456789",
             "value": "'.rgar( $entry, '26' ).'",
             "type": "text"
          }
                ]
       }';

  //SEND OUT THE HTTP Call to transfer Data

      $response = wp_remote_post( $endpoint_url, array(
                    'method' => 'POST',
                    'headers' => array(
     'Authorization' =>'pk_XXXXXXX_XXXXXXXXXXXXXXXXXXXXXXX',
     'Content-Type'  => 'application/json' ),
                    'body' => $body
                ) );
Note: To map the Custom fields, it is necessary to use this useful code snippet to show the ClickUp Custom Field IDs
Add this code to your theme functions.php file, and test the form submission.
Please note you will need to query the API for the assignee user number and the custom field ID numbers.
Need help connecting ClickUp and Gravity Forms?
Fill in the form to get started today!
